
Solar Charging System Post #1 – Panel Mounting
This is the first post of a series about my solar charging system design and installation. I go into some pretty serious weeds about the decision process that led me to my particular solution. My particular solution likely won’t be a fit for your boat unless you have a Catalina 42 Mk II. Even then, you will want to make design decisions based on your own needs. However, some of the elements might be a fit and understanding the process I went through might be helpful to you. The topics for this series as I see it now will be:
- Deciding on a mounting method
- Design of the mount
- Selection of charging system components
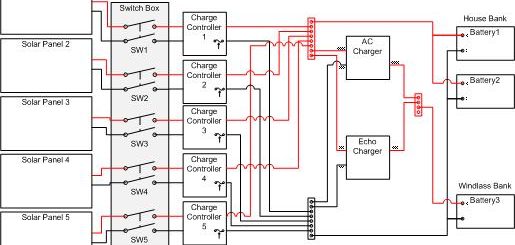
- Design of the electrical panel and circuits
- Installation of the mount and panels Installation of the charging circuitry
I started my solar project by performing a power audit. One fine fall day, I spent a few hours flipping switches and recording ampere readings. As a young engineer in the 90s, I worked in the wind tunnels at NASA Langley Research Center automating the control and data acquisition systems. We take for granted that huge volumes of data can simply be recorded by computerized equipment and the numbers crunched in a fraction of a second, but these tunnels were built in the time of the human data recorders who were assigned to stand in front of panels and panels of gauges to jot down readings at set intervals and human calculators to do all the number crunching. For context, the movie Hidden Figures was based at that very same Research Center and in the town I grew up, but three years before I was born. I found the irony in becoming one of those human data recorders to capture the readings for Kestrel’s power budget. But I digress.
What I found, unsurprisingly, was that my biggest amp-hour draw was my Sea Frost refrigerator. My goal in adding solar was to be able to power the boat, including the refrigerator, for an extended period of time either under sail or at anchor without running the engine to charge the batteries. By this point I had converted all but a tiny fraction of my cabin lighting to LED. Even with every light in the boat turned on, the power draw is now minuscule. The anchor light had already been converted by the previous owner, so also minimal draw. The fans were actually also surprisingly low in current draw. Also surprising was that the electronics and auto pilot weren’t too bad either. The fresh water pump is a power hog, but it only runs sporadically. The refrigerator, however, is a big draw and runs constantly in the summer. Basically, I needed enough amp hours for the refrigerator plus a little more to cover the electronics and autopilot while sailing and the intermittent use of the fresh water pump.
The other part of the equation is the available space for solar panels. Power ratings of the panels are mostly based on square inches of surface area with some variability for efficiency. A 100 watt panel has about the same surface area from panel to panel with the dimensions varying based on the configuration of the panel (square versus rectangle). On Kestrel I had two choices, actually three if I combined the first two.
My first thought was to get some flexible panels and have them sewn onto my bimini top. This was a very attractive option because, despite the much higher cost of the panels, the mounting cost was pretty low. However, after doing a lot of research, I came to the conclusion that panels mounted this way are subject to a lot of flexing as wind passes over the top. That flexing directly translates to mechanical fatigue of the very expensive panels, leading to a much shortened life span and need for frequent replacement. Now I based this assessment on information that is completely anecdotal and not the result of rigorous testing. I read time after time of cruisers who bought flexible panels that ran the gamut from top end European manufacturers to Chinese panels from Amazon and Alibaba to have them fail either due to clouding of the transparent surface coating or fail due to cell degradation. I’m sure flexible panel advocates and suppliers will be crying foul at these statements, but think about it for a minute. Those canvas mounted panels are going to be subjected to mechanical stress every second there is air blowing over them. Just look at your bimini in any kind of a breeze. A panel attached to that fabric is going to be flexing constantly and there is no way that the circuit traces in that panel are going to withstand that long term. This would be especially bad for panels draped across the bows of the bimini.
Still considering the flexible panels, I saw were some folks who mounted the panels on rigid plastic to damp out the flexing. That became my next serious consideration. Specifically, they mounted them on relatively thin, polycarbonate, multi-wall roof panels used for green houses. This then required a hard mounting system of some sort. The most obvious would be to fabricate a couple of stainless steel, 1” tubes that are flat in the middle for panel mounting and curve down at each end to attach to the bimini frame. The tubes would span the width of the bimini and the panels would be mounted on top. I realized that this arrangement would also require cross members to stabilize the structure. Once I got through that iteration, it felt I had something that would weight too much for me to comfortably mount to a bimini frame designed to support a canvas top on windy days. While I have seen photos of these rigs mounted to bimini frames, my gut told me it was a bad idea for my bimini. It all comes down to judgement and personal choice.
The next path I explored was the other end of the mounting spectrum, a dinghy davit/ solar arch. I wasn’t really interested in the dinghy davit function as I don’t currently own a dinghy and I have room on the foredeck for a ten footer if I decide to get one, but having a solar arch would let me mount rigid panels. They are so much less expensive and help offset some of the cost of the arch. One thing about the arch concept that I didn’t like was the weight of the arch and the panels being so far aft. The other thing that I didn’t like was what it was going to cost. It was just going to be too damn expensive for my budget.
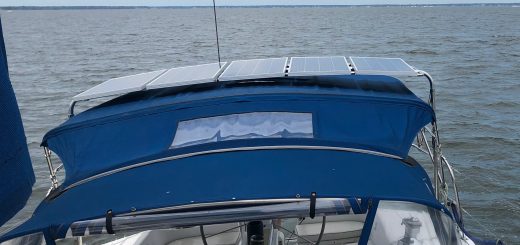
I almost threw in the towel at this point when one of the fabricators I was talking to suggested a simpler solar only arch that would mount over the bimini rather than aft of it. The arch would be 1 1/2 stainless steel tubing, mounted with flanges and backing plates to the deck and cross connected with the stern railing via a diagonal strut to prevent forward/aft motion. It would be strong enough to support an array of panels across the width of the bimini, would be significantly lighter than the davit arch with the weight more forward, and be less than half of the cost of the davit arch. This brought the project back into the realm of the possible for me. Below are a couple of renderings from the fabricator of the solar arch, alone and with panels.
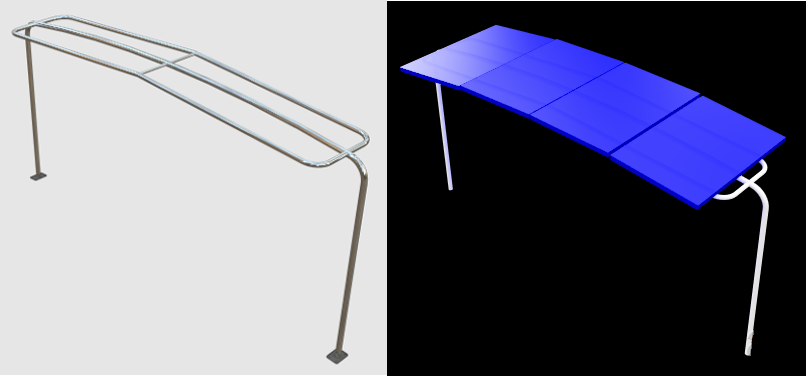
Before I leave this topic, let me quickly recap the options I considered viable for Kestrel. The first was the dingy davit which would have been a fine solution, but more expensive than I could handle. The second was the simplified solar arch that I went with. I still have the option to expand my solar by adding that super expensive davit arch and more panels, but I won’t be going in that direction anytime soon if at all.
Now that I reached a decision point on how to mount my panels, the next challenge was to fine tune the design of the arch for fabrication. This I will save for the next post. Prepare yourselves for an exciting discussion on measuring.

Very good write up. We had davits so incorporated those in with an additional 1″ tubing over the top of bimini. 4 panels of 350 each. Still not enough. With about 20% of your days only getting 20% of obtainable solar you can run short some days.
I guess I’ll see how my 500W of solar works out this summer. Fingers crossed that it can keep up.
Terry:
Really enjoying reading your thought process in your posts, and how evaluate options.
Please keep it up. Thanks
Paul
Thanks, I really appreciate the feedback.