
Building an Anchor Bridle
Last summer, we spent some time at anchor. Kestrel has an anchor windlass, but no central cleat or post on which to lock the anchor rode down. There is an opening on the port side of the anchor locker hatch cover leading to the bow cleat, but it is awkward to use and works only for the rope part of the rode. That means there is no good way to get the load off of the windlass unless all the chain had been deployed. Also, there is considerable pressure on the anchor roller and a tendency for the rode to chafe on the roller as the bow is blown back and forth.
The obvious solution is to use an anchor bridle, a device that connects to the rode and is tied to both bow cleats, taking the load off of the anchor roller and the windlass. I thought to buy an out-of-the-box bridle, but bridled at the cost. Being winter when my mind was thinking about this, I decided to make one myself. I like working with rope and this seemed like it would be a fun project. Between the cost of the parts and the time I spent building the bridle, I’m sure it would have been cheaper to just buy one. However, I was just going to be doing nothing useful so my time isn’t really a factor. It did take me longer than I expected, but pretty much everything I do takes longer than I expect. That said, I really did enjoy the process of building it and am happy with the product.
My good friend Google showed me lots of different bridles and rode attachments, and I read through many board postings from sailors offering up their solutions. I was in a quandary though because I needed it to attach to both the rope and chain parts of the rode. There are chain hook rigs that can be used and various knots that can be tied to both chain and rope to attach the bridle. I thought I had it figured out half a dozen times before I found a reference to the Mantus website. The bridle system they had on the site seemed to be exactly what I wanted. That’s when the whole price thing became a factor and I decided to build my own.
Full disclosure here, the bridle I built borrows heavily from the Mantus bridle design. If you don’t have an affinity for rope work or don’t have time to put into sourcing all the parts and building one, I recommend buying theirs. If you want a fun project to do at home, read on.
Bridle Construction
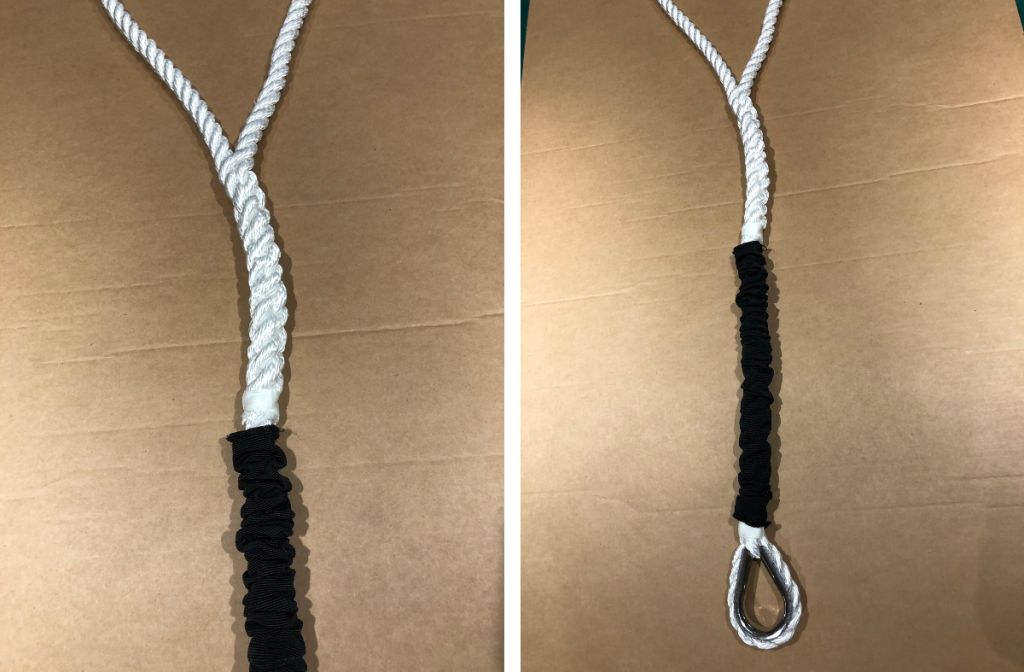
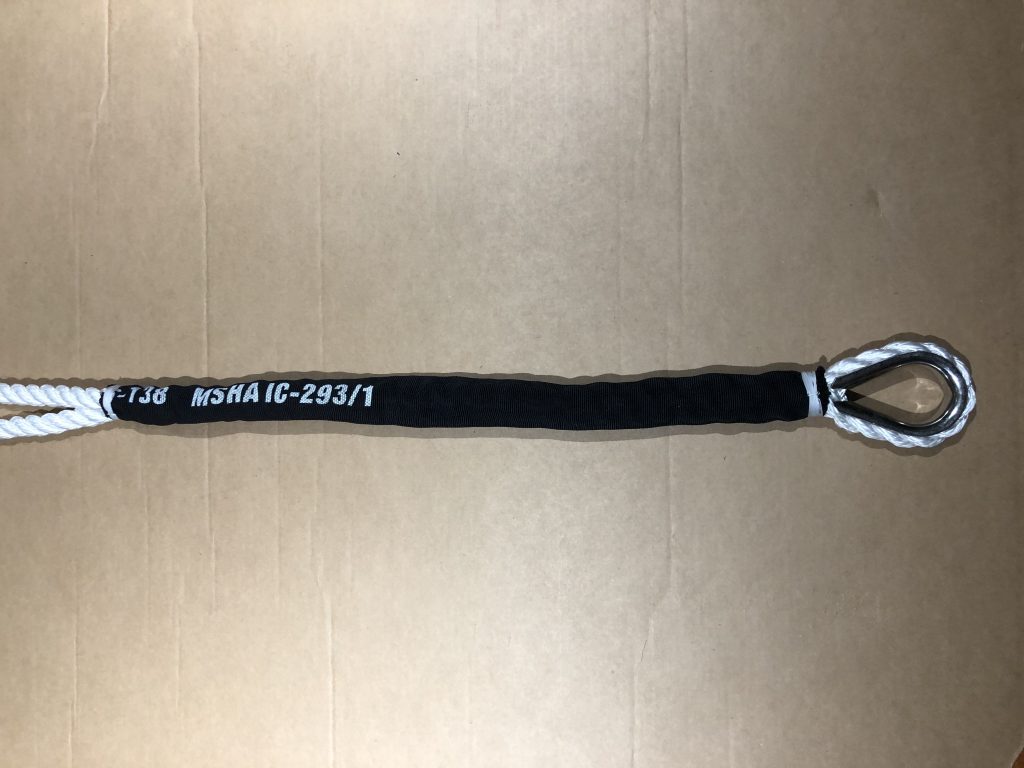
The bridle consists of two lengths of 3/4” nylon three-strand rope, spliced together in a V with a stainless steel thimble spliced to the bottom of the V. Below is a picture of the splice of the V and another showing the thimble spliced in. The chafe guard material is bunched up so you can see the splice, but it does extend to the end of the splice once extended as shown in the third picture.
At the end of the two arms of the bridle, I added chafe guard and eye splices to allow for easy attachment to the bow cleats. All of these are standard three-strand splices that have been whipped at the end to keep them tidy. I also whipped right at the thimble to keep it nice and tight. If you don’t know how to splice three-strand rope, I suggest having a look at the many tutorials on YouTube. I really wish they had been around when I learned to splice, trying to figure it out from Chapman’s was a challenge.
When constructing the bridle, I wanted to make sure I got the lengths of the two arms of the V as close to the same as possible with minimal cutting and waste. The approach I took was to use a single length of rope and not cut it until after the thimble and the V had been spliced. In essence, I ended up with a small eye splice at one end wrapped around a thimble and a huge eye splice of the rest of the rope at the other end such that the two splices ended very near each other. I then pulled the huge eye tight and cut it at the end away from the splice, giving me two equal length arms. Those two arms then got eye splices at the end of each for looping onto the bow cleats. The other trick was getting the chafe guard in place. I threaded the chafe guard for the thimble after making that first splice. I made sure it was long enough to cover both the thimble splice and the V splice. I bunched it up at the thimble end so that I could make the V splice and then pulled it up over the V splice. I threaded the chafe guard on for the eyes at the ends of the arms before splicing those eyes. I secured all of the chafe guard using whipping thread. One thing to watch out for is that you need to leave slack in the chafe guard to allow the nylon rope to stretch under load. I didn’t and now need to go back and re-secure one end at the V.
Pendant Construction
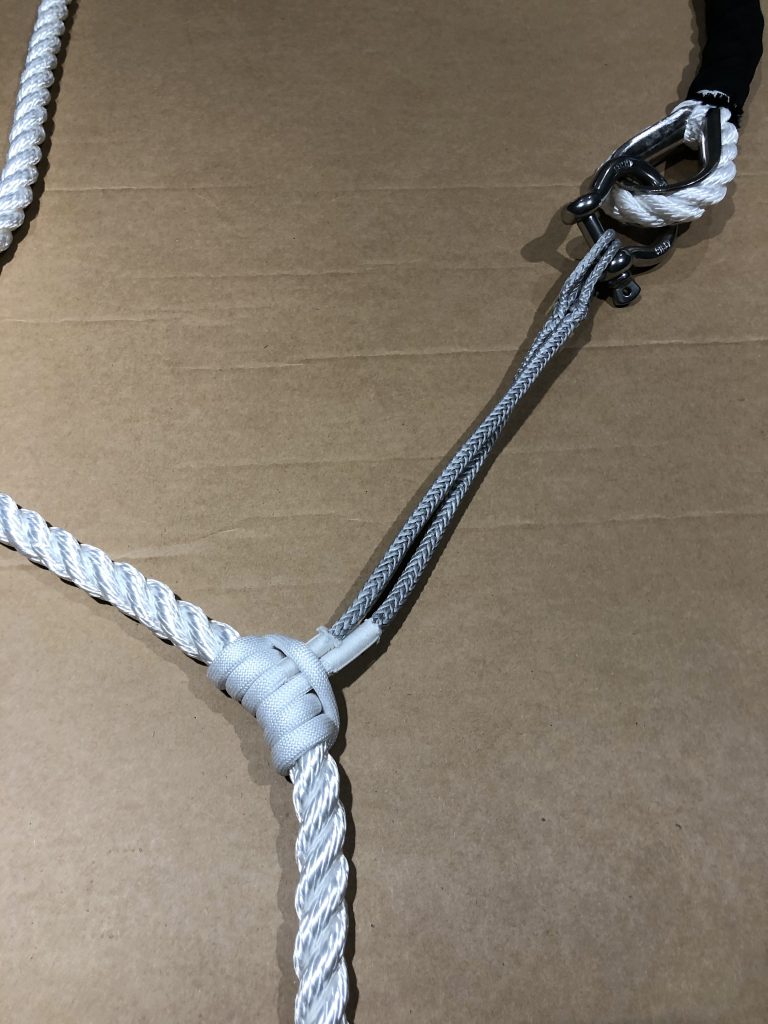
For the attachment of the bridle to the rode, I built a pendant using a length of Dyneema with eye splices at the ends and chafe guard in the middle. The way it works is to use a prusik knot to attach the pendant to the rode, two-pass for chain or three-pass for rope. The 3/16” Dyneema has a breaking strength of 5,400 lbs and the prusik is superior to a rolling hitch as it is much easier to remove from the rode after being loaded up while at anchor. A stainless steel shackle is used to connect the Dyneema to the bridle thimble. The Dyneema is a single braid and I used a Brummel lock splice. This is actually a very simple splice and YouTube is a great resource for how-to videos on that one too. The picture below shows the pendant with chafe guard installed, tied to a rope rode with a three-pass prusik knot, and attached via shackle to the bridle. I suggest you use a little more chafe guard than you think you need. Mine ended up being almost not long enough and it would be nice to have a little extra wiggle room.
Bridle Parts
- 55’ – 3/4” 3-strand nylon rope
- 15’ – Cordura tubular chafe sleeve, 2.25” wide
- 1 – 3/4” type 316 stainless steel regular duty thimble
Pendant Parts
- 10’ – 3/16 AmSteel-Blue Dyneema
- 4’ – Dyneema anti-chafing sleeve, small
- 1 – 1/2” Stainless steel screw pin bow shackle
Deploying the Bridle
I got to run my first test of the bridle a couple weeks ago when we took Kestrel out for a weekend at anchor. Most everything went as planned except, as mentioned above, I didn’t leave enough slack in the chafe guard at the V and will have to re-secure it. The deployment process is simple and goes like this:
- Drop and set anchor as you would normally.
- Let out the appropriate scope less about 20 ft.
- Feed the thimble end of the bridle without the pendent over the bow tail, through the forward end of the anchor roller bail, and back to a place along the rode between the anchor roller and the windlass that is comfortably within reach.
- Make the pendent fast to the rode using a prusik knot and attach the pendent to the bridle thimble using the shackle.
- Attach the eyes of the bridle arms to the bow cleats making sure the arms are on the outside of the bow rail.
- Let out rode slowly to pass the pendent and thimble back through the anchor roller bail.
- Let out more rode until the bridle takes the strain off of the rode and there is slack in the rode.
To retrieve the bridle, simply reverse the deployment steps. In my first use of the bridle, getting the prusik knot off the rode was a snap, no binding at all. Overall I’m happy with the results of the build and how it behaved in use. Before the bridle, there was noise enough coming from the anchor roller to be noticeable which means there was likely chafing happening. With the bridle, the system was quiet.
This was a fun project to build in the warmth of the house at the kitchen table last winter. If you have the time and affinity to working with rope, give it a shot.
Planning on making this same setup, so, thank you very much for passing along this valuable information!
One slight difference I’m interested in your thoughts on is if it would be simpler and still function as well, to have a long soft shackle for the pendant, thus eliminating the need for a SS shackle and also making the attachment a bit quicker…
Matt,
Thanks for the comment. I didn’t think about a soft shackle there as I pretty much just copied the Manus design. I don’t see why you couldn’t get it to work as long as you put the chafe guard on the dyneema that was going to connect to the rode. Although, thinking about it a little more, the original setup might provide some redundancy should one leg fail. I feel like the prusik knot would stay attached still by friction even if only attached on one side. I could be wrong though.
Terry
Thanks for the research you did on this one. How much of the Amsteel did you wind up using? What is the finished length? I’m about to make a Prusik pendant out of 6mm amsteel because that’s what I have. The bury would have to be longer for the larger diameter line, of course.
Renee,
I didn’t take measurements when I built the bridle, but I looked back and it appears I ordered 10′ of the 3/16 Amsteel to make sure I had enough. I went down to the garage just now and measured that I have 5′ left, so I used 5′. The finished length is probably about 4′ taking into account the eye splices. I used about 2′ of the anti-chafing sleave but should have added a few inches to that.
Terry
Thanks for that information! I have 10’ of amsteel left over from other projects, and am going to make up a back-up snubber.
Once I get to work, I’m sure I’ll come to similar conclusions about working length. It helps to have that sanity check!